Remember that fabulous Fleece Artist yarn that I picked up as a souvenir of Nova Scotia? I've been steadily, happily working through it. Last month I'd whipped up a hat with the blue-faced leicester, which was pleasant but somehow lacked punch. Last night I finally figured out how to make the most of the yarn.
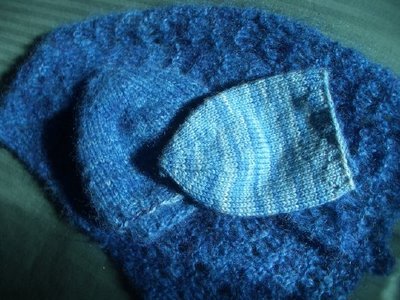
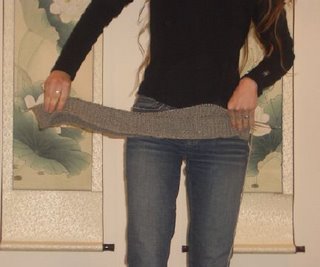
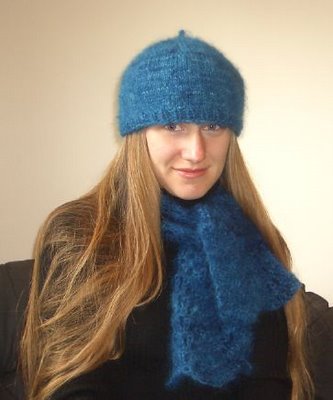
Scarf: A short, fuzzy once-around-the-neck-and-knot-jauntily scarf
Yarn: Fleece Artist 'Mo' Mohair -- this is *monster* mohair, not some dainty kidsilk haze or kid seta
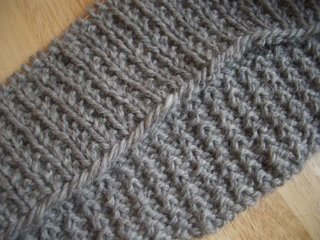
Pattern: 24 stitch scarf in a feather-and-fan pattern (knit two rows, purl one row, then pattern row of k2tog twice, (yo k1) 4x, k2tog 4x, (yo k1) 4x, k2tog twice -- and repeat) on size 11 needles.
Hat: super dense cap, with nubbin at top
Yarn: Fleece Artist 'Mo' and blue-faced leicester, combined
Pattern: cast on 64 stitches, join into a circle. K1P1 ribbing for 4 rows. K1 P1 inc1 for 1 row (96 st). Knit straight until about 4.5 inches long. Dec in ten sections, alternating a decrease row with a plain row (note: first dec row will be (k2tog, k17) twice, (k2tog, k8) twice, (k2 tog, k17) twice. Second dec row will be (k2tog, k7) around. Third dec row will be (k2tog, k6) around. And so forth). I did a few rows of 3-stitch i-cord at the top to make the nubbin. Needles were size 8 16" bamboo circular, with bamboo dps for the top.
I couldn't get the color right with this picture - which shows both hats folded against the scarf - but hopefully you can get a sense of the marvelous texture of the yarn (click on photo for larger view). The mohair and blue-faced leicester are very pleasant on their own, but they create a most amazing fabric when combined.
I managed to get the scarf and both hats from one of the 'favorite soft mitten' kits, which makes for quite a good value.
Wednesday, October 25, 2006
Monday, October 23, 2006
Banishing Dark Thoughts
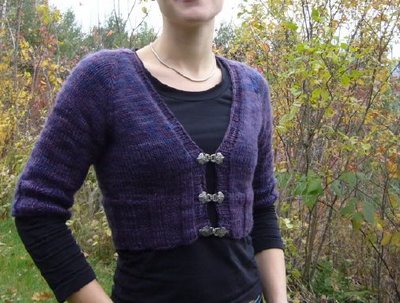
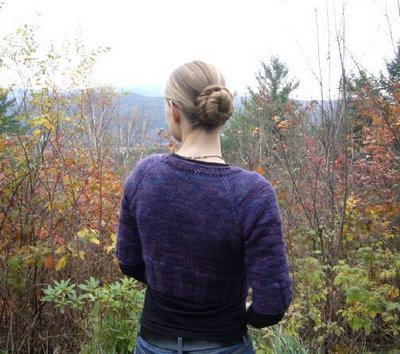
I started this sweater towards the end of an exhausting month in which I got married, moved, finished a major paper, and took my comprehensive exams. The exams are terrifying enough on their own - PhD students usually study solidly for months and come close to nervous breakdowns - and trying to prepare for the exams in the midst of all these other major life events was truly harrowing and dark-thought generating. This cardigan saw me through the roughest, final patch, and it bears a slightly gothic aesthetic sense. When I wear it, it banishes my dark thoughts.
Pattern: my own, taking its lead from Glampyre's mini-sweater
Yarn: Malabrigo worsted, about 2.75 skeins
Needles: size 9 bamboo circulars for the body, and size 9 birch dp's for the sleeves
The malabrigo yarn is scrumptiously soft, and even this half-sweater keeps me warm. The only drawback to the yarn is that it's also rather inelastic, such that the ribbing doesn't adequately pull the sweater snug against my body (if I were doing it again, I'd sneak some decreases into the ribbing section). But on the whole I'm immensely pleased with the way this has turned out. If anyone's interested, I might try writing up the pattern.
Friday, October 20, 2006
zimmermaniac socks
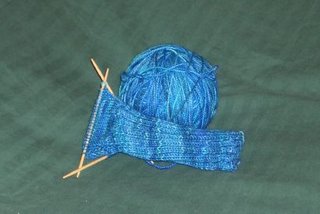
Afer the debacle of the gray Mountain Man sweater, I decided to scale down to a smaller Zimmerman pattern (the sweater will be back soon - but I need a breather and new needles before trying again). Time for socks! I'm following the pattern in "Knitting Without Tears"
Lovely Fleece Artist yarn and Brittany needles are making for an entirely pleasant knitting experience. If one needs to build up the knitting confidence, this is a recommended way to do it.
Tuesday, October 17, 2006
good grief
It was with great excitement that I cast on for Mountain Man's eco-wool sweater this past weekend. I carefully swatched and measured and cast on what seemed like a very large number of stitches. Then I hopped on the bus back to Cambridge and knit my little heart out for two hours. Progress is addictive, and I never really stopped to consider whether I liked the way the stitch pattern was turning out or how big it was (also, it was just on a 24" circ, so it was hard to tell). But I came back to my senses last night when I spread it out to see:
Good grief! Needless to say, this is destined for the frog pond. It does give me an opportunity to re-evaluate this whole project though. The first lessons include:
1. Need for a new stitch pattern. Mistake ribbing is excellent for a scarf, but I think it's too busy for an entire sweater. The wrong side is a bit more subtle (see both below). But I think I'll be looking for something else entirely.
2. Need longer needles. A 24" circular is fine for a close-fitting sweater for myself, but for a loose-fitting man's sweater, it's absurd. Upside is that I now have an excuse to test out some of knitpicks new options needles!
3. Need for better gauge checking. My gauge swatch gave me 4.75 st/in, but as soon as I started on the sweater it went up to 5.25 st/in. That adds up to over 5" difference in the circumference of the sweater. The lesson is that I need to be very conscientious about checking that my sweater gauge matches my swatch gauge.
Thursday, October 12, 2006
progress and sweater plans
Substantial progress has been made on the tie-front shrug that I started last month, progress both in terms of knitting and major re-designing. The softness of the yarn (Malabrigo) made me think that the wear and tear on the ties would have seriously limited the life of the sweater. And the increases closed the front rather faster than I'd expected. And the style seemed a bit, well, on its way out perhaps. The plan now is for a half-length cardigan that closes with pewter clasps. Looks a bit ragged in the picture, but I'm gleeful about it when it's on!
I'm all in full sweater mode now, getting ready to embark on two more seamless sweaters a la Elizabeth Zimmerman - bottom up rather than top down. On the left is Knitpicks Andean Silk in Navy, intended for a yoked sweater for myself, probably in plain stockinette with garter stitch borders. On the right is Cascade Eco Wool in Silver,intended for a mistake-rib, raglan sweater for Mountain Man. Hopefully I'll be able to finish my purple cardigan this weekend and will very soon be able to cast on for these sweaters.
Thursday, October 05, 2006
natural color
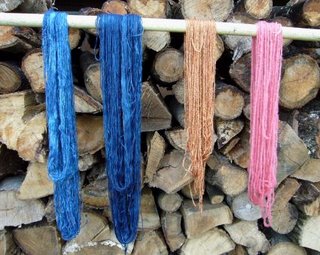
I'm all abuzz with inspiration after attending a natural dyes workshop last Saturday. It was at St. Brigid's Farm in Peacham, VT, which had the most wonderful fiber workroom in a converted garage - overflowing bags of mohair, spinning wheels, three looms, and an excellent staging area for dyeing. I was particularly taken with the artistic array of naturally dyed wool - this photo doesn't do justice to the colors, which ranged from deep, jewel-tone magentas to subtle, smoky purples to soft yellows and woodsy browns.
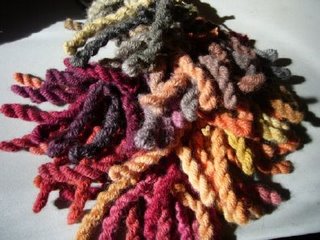
I mixed up two small dyebaths for my samples. First I got an incredibly luminous watermelon hue with cochineal and quebracho red on plain, worsted wool. Second, a gorgeous golden-caramel color using madder on tussah silk.
After that, I got to toss some fingering merino and a silk-wool blend into an indigo dyebath. I brought home the saturated samples in plastic bags. The next morning, I rinsed them in a bucket of rainwater (that's the photo above - complete with pine needles and autumn foliage) and hung them up to dry.
I'm in love. I'm already plotting all kinds of experiments with marigolds, which I pluck from the garden, and black walnuts, which I gather from carefully scoped-out trees around Cambridge. The workshop itself primarily used powdered dye extracts rather than the raw plant and insect material, but I'm really excited to try working from the natural materials too.
As an entertaining post-script, I feel I should add a few words about my only previous experience with natural dyes. When I was traveling in Peru two years ago, I was informed by a guide about the "cochinilla" bugs that infested much of the prickly pear cacti. I made my sister slink around with me and scrape a good cup or so of the fat little bugs off the cacti, intending to try dyeing something of my own. All I had that was clean and white was an unopened pack of cotton underwear - so into the bag of squished bugs it went!! Vaguely knowing something about needing something acid to fix the dye, we squeezed in a couple of limes from the market. And the results? (sigh). You can see the underwear drying in the sun here:
The fabric initially turned an amazing rich, dark fuchsia, as seen on the right. But as it dried it started to fade to murky purpley-grey, as seen in the middle. By the time they were fully dried and then re-washed, they were a dull greyish-white with icky black spots (not mildew - they dried in no time in the hot, high altitude sun). The weird thing was that for the next few months, I would occasionally find spots of magenta re-appearing on them after they were washed. But even that entertainment soon ended. I think they may end up in the marigold dyebath next.
This natural dyes workshop gave me new perspective on this incident in three ways: 1. I now understand why the dyeing didn't work. 2. I now realize how expensive cochineal is, which makes me wish I'd dried the bugs and smuggled them home instead of wasting them on lousy underwear. 3. I am thinking they might be well suited to marigolds next....
Monday, October 02, 2006
happy autumn!
Saturday was a gorgeous autumnal day in Vermont: mist in the valley - chilly and breezy - air perfumed by fallen leaves and pine needles - overgrown gardens on the edge of frost. It was a perfect day for curling up with a steaming cup of lapsang souchong tea and wool knitting.
I spent the afternoon playing in a natural dyes workshop, but I'll leave that to another post. For now I just want to share the weekend's finished objects, festooned with a few blossoms from the garden.
Ipod Nano Cover
Pattern: just whipped up on the spot. 26 stitches, knit straight down with just one row of eyelets for a cord (which I later deemed unnecessary). i invented a funny bind-off at the bottom - a three needle bind-off would have been best.
Yarn: leftover Trekking XXL from my jaywalkers
Needles: size 1 dpns
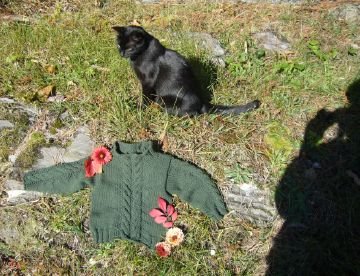
Cabled Baby Sweater
Pattern: 'Bookworm Sweater' from Miss Bea's Rainy Day
Size: 1-2 years
Yarn: Rowan All Season's Cotton, 'Safari' (discontinued color), 5 balls
Needles: size 7 16" circular for the body and sleeves; size 6 16" circular for the neck
Modifications: Where to start? I started this sweater last summer but was finding it to be too short and fat. I started over, doing the body up to the arms on one circular needle, then dividing to do the front and back flat. I pared 5 stitches off each side of each side, which is to say the body was made with 20 fewer stitches than was called for (although 4 of those stitches accounted for not needing selvedge once it was done circularly). I only bound off 3 stitches for each side of the arms (i.e. 6 stitches for each arm in total). I lengthened the body up to the sleeves. Lengthened the sleeves. Shortened the neck.
In the end, I think it's a marvelous sweater, and it feels so satisfying to have finished a project that had been on pause for too long. I'm especially fond of the cable pattern with the seed stitch spikes in the background. If I were doing it again, I'd probably take the cable pattern and adapt it to a bottom-up seamless raglan sweater, because I found all the seaming and fitting of pieces to be slow and fiddly. But I'm really pleased!
As is Leila. Naturally, she sauntered over towards my knitting photographs to inspect my progress. I think this shot gives you a useful sense of scale.